Simulated WiFi Band Steering
Overview
In this post, I'll demonstrate how to simulate WiFi band steering without any physical WiFi radios. We'll use open source Linux tools that are used in commercial WiFi products and hopefully learn a thing or two on the way!
If you'd like to replicate this yourself, you'll need a Linux system with sudo access, kernel support for the mac80211_hwsim driver
(which is generally the case for most Linux distributions), and hostapd and wpa_supplicant installed. These tools will permit
complete WiFi simulation in software. However, the same setup will also work with real WiFi radios. This can also be run within
a container or virtual machine.
This setup assumes some experience using Linux, Wireshark, and WiFi. There are plenty of great resources out there. I maintain a reference of common Linux commands here. Additionally, if you'd like to (responsibly) do real WiFi packet capture with Wireshark, I wrote a guide which is available here.
Background
Before we dive in, I'd like to first cover some background WiFi information, especially as it relates to band steering. If you're familiar already, skip to the next section.
In WiFi, clients select and connect to the WiFi access point (AP) BSSID they want. Each client operates slightly differently, but metrics like channel utilization and estimated throughput strongly influence this decision. As a client operates and possibly moves around in its environment, conditions will change. The client may decide to shift to another channel on the same AP (different BSSID), it may roam to another AP, or it may do something else entirely! These decisions are ultimately left up to the client, not the AP.
Given this, an AP is left with limited options to influence the client decisions. An AP can reject the client's authentication/association request or send a deauthentication frame or disassociation frame. However, these methods are heavy handed and may result in poor user experience.
Several amendments to the WiFi 802.11 standard serve to address this and to improve user experience generally. Amendments 802.11k (neighbor reports), 802.11r (fast transition), and 802.11v (BSS transition management) are a couple widely known examples. For the purposes of this post, we'll focus on 802.11k and 802.11v, which introduce neighbor reports and BSS transition management (BTM), respectively. Both are essential for band steering, whether it be simulated or real-world. Note that enabling band steering is somewhat controversial in the WiFi world, I take no side here!
If you'd like to brush up on band steering or the amendments I mentioned, check out my colleague Isaac Konikoff's talk on band steering fails here and this Cisco 802.11v explainer available here. For more in-depth coverage, check out my colleague Sitarama Penumetsa's lecture here from his WiFi fundamentals course.
With this all in mind, we're ready to setup for testing!
Test Setup
In order to simulate band steering, we must first configure our test environment. While this same configuration is possible with
real radios, we'll instead use the mac80211_hwsim Linux driver to simulate this testing entirely in software, hopefully making
it more accessible.
Recommendations
To make your life easier, I recommend the following:
-
Use three terminals
-
One terminal each for AP, client, and configuration CLI
-
This will permit reading logs while we setup and run the test
-
Now may be a good time to learn how to use
tmuxorscreen
-
-
Disconnect from your WiFi (if present) while running this
-
When running with verbose logging,
wpa_supplicantandhostapdwill output information on any changes to any interface on the system. Verbose logs can become especially busy on a normal system with other WiFi active. -
Do not disable WiFi in your networking daemon. This will enable rfkill which soft blocks WiFi on all interfaces (including the
mac80211_hwsimones)
-
Setup Instructions
NOTE: Most of these commands will require root permissions. I suggest either running all with sudo or login as root with sudo -i.
Steps 1-7 are implemented in this script which lives alongside the configuration we'll use for the testing.
-
Load the
mac80211_hwsimkernel module (driver)# Three simulated radios are needed # 1. Client (STA) # 2. AP 2.4 GHz BSSID # 3. AP 5 GHz BSSID modprobe mac80211_hwsim radios=3 support_p2p_device=0 -
Identify simulated WiFi interfaces and their MAC addresses
# Show interface link-layer information and names ('-br' forces terse output)
ip -br link show
Most likely the
mac80211_hwsiminterfaces will be namedwlan0,wlan1, andwlan2. The driver will additionally create another interface namedhwsim0, which permits packet capture of simulated WiFi traffic.To know for sure, first check the MAC address. The driver creates the interfaces using the format
02:00:00:00:XX:00, where theXXmatches the simulated radio number.If you're encountering issues or want to know more, check out this section.
-
Configure your network daemon to ignore the interfaces
Practically all modern workstation Linux distributions ship with NetworkManager. If you're using something else, I assume you know what you're doing or can figure it out...
When using NetworkManager, we must configure it to ignore the new
mac80211_hwsiminterfaces, which you can do with the following command.# Run this for each simulated WiFi interface, substituting in # your system's interface names for this and subsequent commands nmcli device set wlan0 managed falseWhen complete, the interfaces should show as
unmanagedin the output ofnmcli device status(ornmcli devicefor short), as shown below. You may still see some unexpected traffic (e.g. ARP, ICMPv6, DHCP) and the interfaces may even autoconfigure with a link-local IPv4 address. However, we configured NetworkManager to not control the WiFi interfaces, which will allow us to run our test. -
Download example
hostapdandwpa_supplicantconfigs from hereI recommend using the open (no security) configuration, as this will make packet capture much more simple. With configurations supporting encryption, packet decryption is possible, but security improvements like 802.11w and WPA3 make this increasingly difficult (which is good for security!).
git clone https://codeberg.org/a-gavin/hostap-confs.git -
Start the AP interfaces
# Options used are:
#  -t:  Print timestamps
#  -i:  Specify interface to run AP with. Can be specified multiple times.
#
# For verbose or very verbose logging, add the '-d' or '-dd' options
hostapd -t -i wlan0 -i wlan1 hostapd_2.4GHz-open.conf hostapd_5GHz-open.conf
Assuming no errors appear in the logs, you can verify the AP interface channel/frequency, SSID, and MAC with the
iw wlan0 infocommand. -
Enable
mac80211_hwsimpacket capture interfaceThis interface is likely named
hwsim0.ip link set up dev hwsim0 -
Run Wireshark using the
mac80211_hwsimpacket capture interfacePacket capture requires root permissions. See the Wireshark documentation here for more information on how to enable this.
-
Start the client interface
# Similar options and requirements as 'hostapd' # The '-c' option required to specify the config file wpa_supplicant -t -i wlan2 -c supplicant_open.conf -
Wait for client to connect
As the client connects, you should start to see the simulated WiFi traffic in Wireshark. The simulated client will connect through the normal WiFi client connection process. Connection is complete once the AP responds with a successful association response frame. I recommend using the
wlan.fc.type_subtype != 8filter to not display beacons.Once the client connects, you should also see the message
CTRL-EVENT-CONNECTEDin the station logs andAP-STA-CONNECTEDin the AP logs. Take note of the AP interface that the client connected to. As with the AP interfaces, you can run theiw wlan2 infocommand to verify connection, channel, SSID, BSSID, etc. -
Connect to the
hostapdCLI interfaceIn another terminal, run the following command. This will enter a the
hostapdCLI interface which may or may not permit line editing and/or command history, depending on your system.# Example configs here use default control interface directory. # If you use something else specify it using the '-p' option hostapd_cli -
Select the AP interface to which the client connected
Using the
interfacecommand, select the desired interface. Then, check the list of connected clients with thelist_stacommand, as shown below.$ hostapd_cli -p /var/run/hostapd/ ... > interface wlan0 > list_sta <---- No clients associated, check the other AP interface > interface wlan1 > list_sta 02:00:00:00:02:00
With the simulated client connected, Wireshark running, and the hostapd CLI up, we're ready to run some tests!
Simulated Band Steering Test
Test Overview and Goals
For this test, we'll attempt to band steer the client from its currently associated BSSID to the AP's other BSSID. This test aims to simulate a client receiving a transition request from an AP, which is often seen in real world scenarios, for example a client as it walks away from the AP.
A successful test here should result in the client disconnecting from the initial BSSID and then reconnecting to the other BSSID. This should occur after the client receives a BTM request from the initial AP. The request should include the other BSSID as a preferred neighbor candidate, which should trigger client reconnection to the other BSSID. All of this should be visible in the Wireshark capture we started earlier.
Test Instructions
Using the hostapd CLI interface we configured earlier, we'll use the bss_tm_req command to trigger the client steer.
This command instructs the specified AP to transmit a BTM request frame to the client, hopefully resulting in a successful
band steer.
With the suggested example configs, the client should respond and steer successfully, assuming the command used is correct.
It's possible to simulate a client which doesn't support BTM requests by setting the disable_btm=1 config option
(outside the network block) and reconnecting, but that's left as an exercise to the reader.
The following commands will generate BTM requests to steer the client from one BSSID to the other and vice versa. Adjust as needed. More information on this command can be found in this section.
# From 5 GHz to 2.4 GHz
# First MAC is client MAC. Second MAC (neighbor) is 2.4 GHz BSSID.
bss_tm_req 02:00:00:00:02:00 pref=1 neighbor=02:00:00:00:00:00,0x0000008f,81,1,14

# From 2.4 GHz to 5 GHz
# First MAC is client MAC. Second MAC (neighbor) is 5 GHz BSSID.
# Unlike the 5 GHz to 2.4 GHz config above, the client may take a bit to scan.
bss_tm_req 02:00:00:00:02:00 pref=1 neighbor=02:00:00:00:01:00,0x0000008f,81,36,14
Assuming the command ran successfully, you should see 'OK' in the CLI and a successful BTM request and response exchange in Wireshark as shown below.
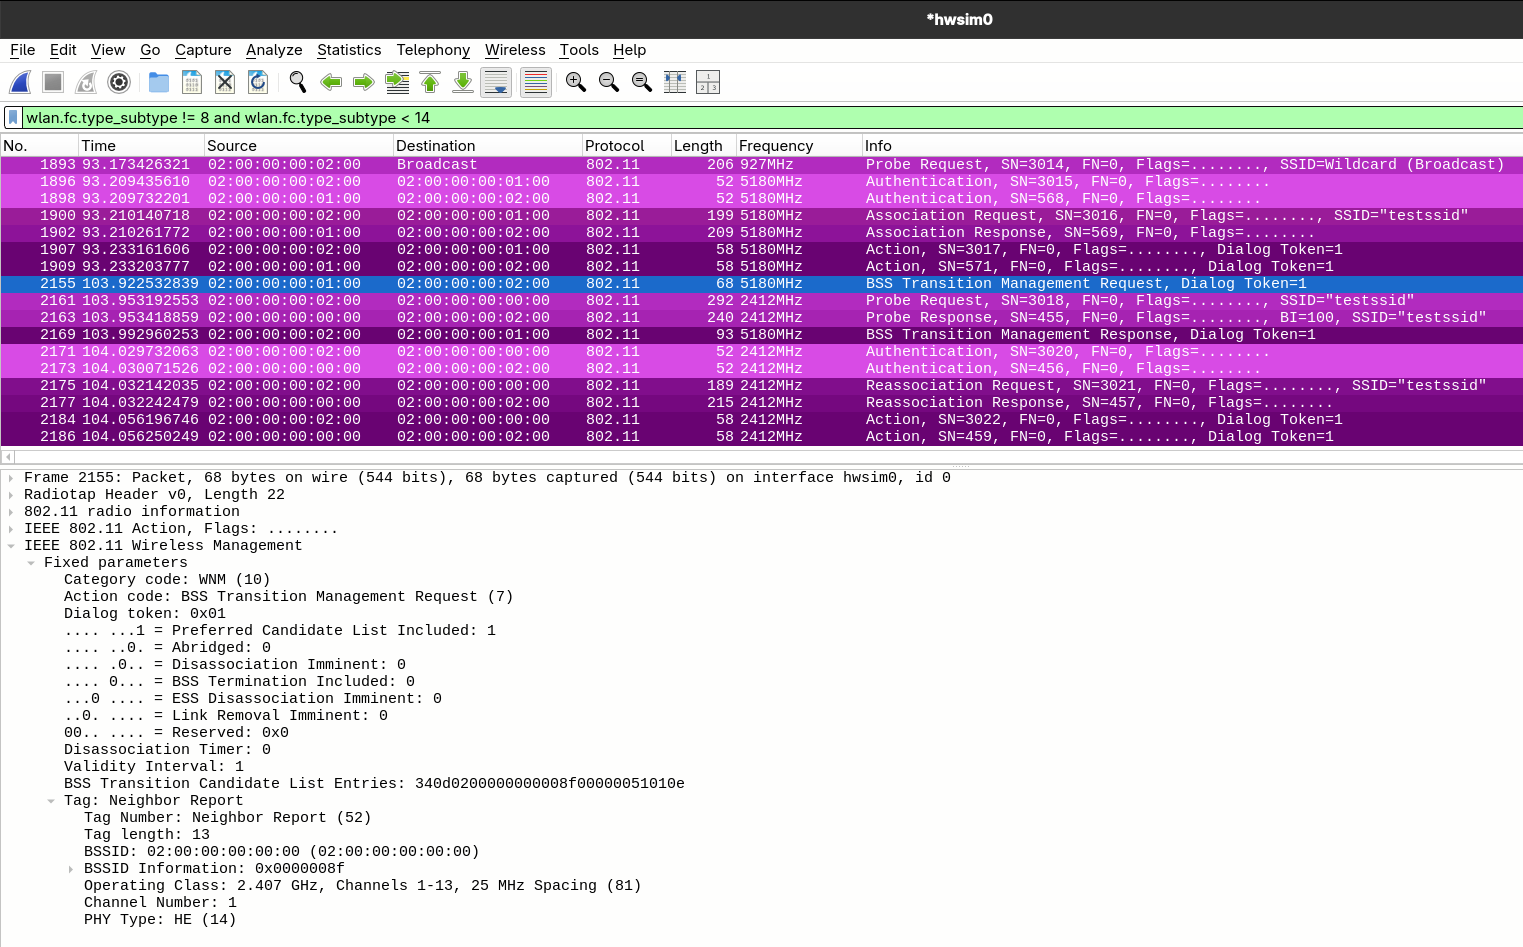
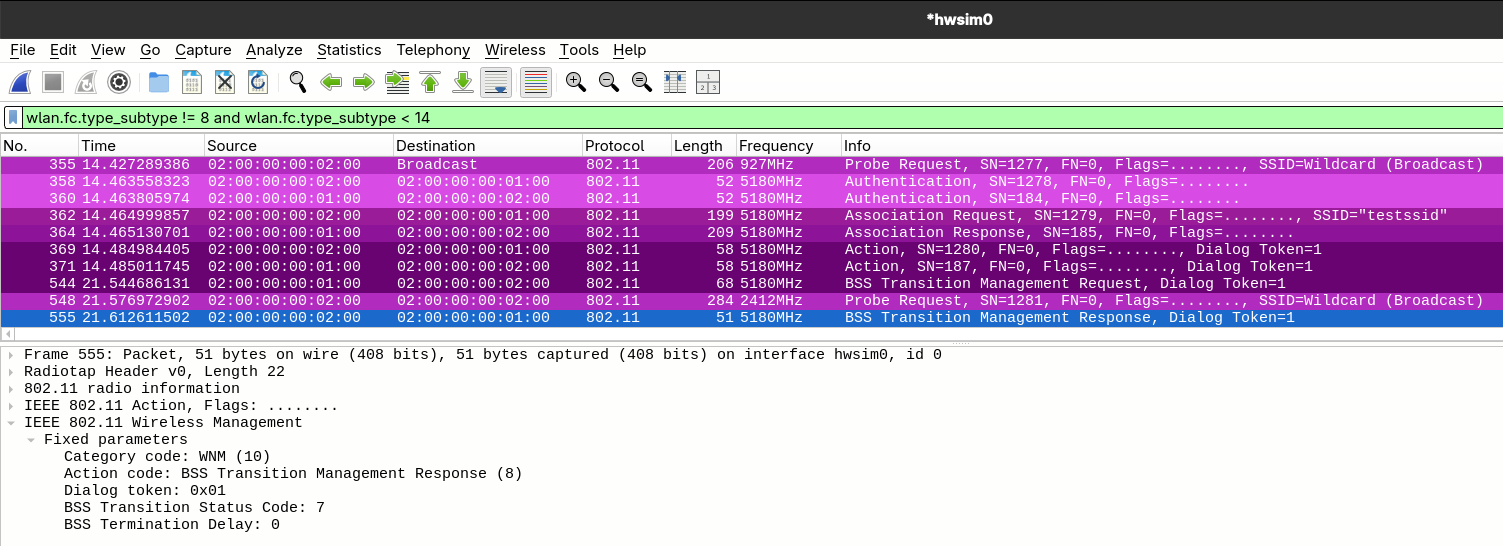
In the case that the command failed to parse, you'll see a 'FAIL' in the CLI. However, if the command succeeded but the client did not steer, there are other issues present.
The following image shows another BTM request exchange. Here the client rejects the AP's request with status code 7, no suitable candidates. If you see similar, possibly you misconfigured the neighbor BSSID, or the client was unable to scan the neighbor.
Closing Thoughts
In this post, we detailed how to run a simple band steering test using a single client and two AP BSSIDs triggered by the AP.
This test was simulated entirely in software using the mac80211_hwsim virtual WiFi driver along with standard Linux WiFi tooling.
Similar testing using the client as the trigger is also possible (using the wpa_cli wnm_bss_query command).
However, upstream hostapd does not support BTM query responses that will trigger band steering (does not
include preferred neighbor report). For that, your best bet will be to test with real APs. Have fun!
Addendum
Identifying Interfaces and MACs Cont
In the case that interface names and MAC addresses are non-default or difficult to identify, there may be several things getting in the way. This section covers a couple reasons why this may be.
The most likely culprit is your networking daemon. If you're using Network Manager, it's possible your system configuration may randomize MAC addresses, which will happen before you can instruct Network Manager to ignore them. I run NixOS nowadays and that's exactly what it did for me.
As mentioned in the setup instructions above, the mac80211_hwsim driver will create the simulated
radios and WiFi interfaces with MAC addresses matching the pattern 02:00:00:00:XX:00. Assuming the driver loaded properly,
if you don't see this in the output of ip -br link show, then networking daemon MAC randomization is almost certainly the cause.
Another possible source of issues could be systemd-udev. On modern Linux distributions which use systemd,
predictable network interface naming is enabled by default (see here for more info).
However, either udev '.rules' files in /etc/udev/rules.d/ or systemd '.link' files in /etc/systemd/network/
(which are used even when running Network Manager) could rename the network interfaces. Unless you've been adjusting
this in your system already, your issue is almost certainly the networking daemon.
bss_tm_req Command Format
In general, hostapd and wpa_supplicant CLI commands are straightforward but not well documented. In the hostapd CLI,
you can run the help to display more information on the desired command (e.g. help status). However, often times the output
is terse, and I find myself referencing the source instead. If you also need to do that, start here
for wpa_supplicant CLI and here for hostapd CLI.
Unfortunately, the bss_tm_req command is one of such not well documented commands. If you used the provided example configs
and your simulated WiFi interface MAC addresses match, the provided bss_tm_req command should just work. If that's not the
case, though, the following details some information on the format of the command.
bss_tm_req CLIENT_MAC pref=1 neighbor=BSSID,BSSID_INFO,OP_CLASS,CHANNEL,PHY_TYPE
-
Client MAC address always required. However, just this won't get you far.
-
Setting
pref=1includes theneighbor=...section in the BTM request.- A client almost certainly won't steer without this.
-
In the
neighbor=...section, all information is for the target AP (AP to steer the client to)-
Neighbor information is verbatim set in the BTM request neighbor report with basically no error checking
-
OP_CLASSdefines the operating class of the neighbor AP's channel -
PHY_TYPEdefines the neighbor AP's PHY capabilities, as defineddot11PHYTypein IEEE Std 802.11-2020, Annex C- HT: 7
- VHT: 9
- HE: 14
- EHT: Not in 802.11-2024, so unsure
-