Simulated WiFi Roaming
Overview
In this post, I'll demonstrate how to simulate WiFi client roaming without any physical WiFi radios. We'll configure tests that showcase both basic client roaming as well as IEEE 802.11r BSS Fast Transition (FT) client roaming. For the 802.11r FT roaming tests, this guide will showcase FT over the distribution system (DS) 802.11r roaming specifically. With a quick change, though, you can also run FT over the air (FT-OTA) client roaming.
We will build on information discussed in my previous post Simulated WiFi Band Steering, which walks through a somewhat similar test with a bit more details for the setup instructions.
As before, you'll need a Linux system with sudo access, kernel support for the mac80211_hwsim driver, and hostapd and wpa_supplicant
installed. While mac80211_hwsim is only used in software testing, the same concepts apply generally to real WiFi on Linux, and these tools
are also used in widely production WiFi systems across the globe!
This setup assumes some experience using Linux, Wireshark, and WiFi. There are plenty of great resources out there. I maintain a reference of common Linux commands here. Additionally, if you'd like to (responsibly) do real WiFi packet capture with Wireshark, I wrote a guide which is available here.
Background
Note on Simulated Testing
Using mac80211_hwsim to simulate tests permits demonstration of the functional elements for different types of WiFi roaming.
While the driver is capable of more interesting simulated tests, including variable simulated distance and many more clients,
we will not utilize these features.
Given this, the frame times observed will not be particularly meaningful. In a real environment, background traffic and other real world variables affect roam latency. In our simulated tests, there will only be a single client and the two APs.
To get a better sense of how different roaming types function, I encourage you to replicate this testing with real WiFi radios. The same concepts and tools apply, and the results will be much more interesting!
Basic Idea/Goal of Roaming
In WiFi networks, a client will attempt to maintain the best possible connection as it navigates its environment. Based on internal, often proprietary logic, the client may adjust its connection as network conditions change in an effort to meet this goal.
This process is generally referred to as roaming and occurs in one of a few ways. For example, a client may roam from one AP to another on the same network, between different BSSes on the same AP (also on the same network), or to a different network entirely. In the case of roaming between different BSSes on the same AP (e.g. between bands), you may hear the term band steering. The key goal in whichever type of roaming remains maintaining good user experience through the best possible connection. For the purposes of this guide, I will ignore roaming between separate networks.
As the client roams, it must temporarily disconnect before reconnecting. During disconnection, applications must wait to send and receive more data until the client reconnects and the roam completes. The longer the disconnect, the longer the application must wait, and the poorer the user experience becomes.
Many applications can "paper over" such disconnects by caching data, for example buffering a video. However, real-time applications like live video streaming and voice chatting cannot. Given this, minimizing the roam time or latency is paramount to ensure good user experience.
How Roaming Works
There are several methods/types of roaming, and WiFi 8 will most certainly add more complexity. For simplicity, focus on two types of roaming and will not consider roaming between different networks. These methods are:
-
Basic roaming (full reconnect)
-
IEEE 802.11r BSS Fast Transition (FT) roaming
In basic type roaming (non-802.11r), a client must complete the full connection process when switching from the initial BSS to the target BSS (e.g. between APs on the same network). This occurs when either the client, the network, or both do not support 802.11r. It requires authentication, association, and the 4-way handshake, among other things. During this process, the client is disconnected and cannot send or receive any application data.
While non-802.11r clients perform the full connection process with any network, 802.11r-capable clients also do so when network does not support the 802.11r (otherwise, this would break backwards compatible). To utilize 802.11r, both the client and the network must enable it. Generally, enterprise WiFi deployments turn 802.11r on, especially if using 802.1X. For home and small business networks, though, this is less common, meaning non-802.11r roams are a regular occurrence in everyday WiFi.
For clients and networks which both enable 802.11r, client roam should utilize the 802.11r-defined process for the switch. This process relies on network coordination, often through the use of a controller, and the assumption that the network has already authorized the client to use the network. These prerequisites enable 802.11r roaming to skip some of the connection process, reducing roam latency and improving user experience.
To keep things simple, this guide details simulated roaming with a personal security configuration network with two separate APs coordinating with each other (no controller). The configuration will also disable 802.11w to ensure Action frames are unencrypted and visible in the packet capture.
In the real world, 802.11r is much more common in networks with enterprise security configuration (802.1X). While still following the standard WiFi connection process, enterprise security networks require an additional EAP handshake process. This process requires several frames and introduces additional connection latency, stemming from both the additional frames as well as any latency introduced as frames make their way to/from the authentication server. Given this, reducing roam latency for enterprise networks takes on heightened importance.
For more on IEEE 802.11r BSS Fast Transition roaming and roaming generally, you can checkout the following presentations:
Test Setup
To run simulated roaming tests, we first need a working test environment. To focus more on test network configuration, initial setup instructions will be a bit terse. Please reference my previous simulated WiFi post for more detailed explanation.
For simplicity, I recommend disconnecting from WiFi while running these tests, using Ethernet for network access, if at all possible.
I also recommend preparing multiple terminals (e.g. via tmux), as we'll use about four here. More details on these suggestions
available here.
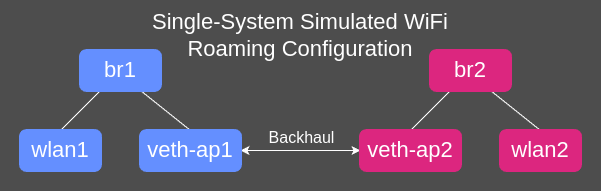
Since IEEE 802.11r requires a backhaul, this setup will involve additional bridge and veth interfaces. The basic roaming test does not need or use this, but we'll use it anyway. Real world WiFi deployments use a mesh or wired backhaul to permit inter-AP communication when needed, or for larger networks a dedicated controller. Here, we'll use software interfaces to simulate the backhaul on the same system. See the diagram below for reference.
Setup Instructions
NOTE: Many commands in this post will require root permissions (e.g. run with sudo), including hostapd, wpa_supplicant, ip, modprobe.
-
Load the
mac80211_hwsimkernel module (driver)# Three simulated radios are needed # 1. Client (STA) # 2. AP1 # 3. AP2 modprobe mac80211_hwsim radios=3 support_p2p_device=0 -
Identify simulated WiFi interfaces and their MAC addresses
ip -br link showMost likely the
mac80211_hwsiminterfaces will be namedwlan0,wlan1, andwlan2.The driver will create an additional interface named
hwsim0, which permits packet capture of simulated WiFi traffic. The packet capture interface should have the MAC address12:00:00:00:00:00. -
Enable
mac80211_hwsimpacket capture interfaceip link set up dev hwsim0 -
Add and enable the required veth interfaces
# Create veth pair ip link add veth-ap1 type veth peer name veth-ap2 # Both ends must be up for pair to be active ip link set up dev veth-ap1 ip link set up dev veth-ap2 -
Add and enable the required bridge interfaces
# AP1 Bridge ip link add br1 type bridge ip link set up dev br1 # AP2 Bridge ip link add br2 type bridge ip link set up dev br2 -
Add child interfaces to respective bridges
When started with the provided config files,
hostapdwill automatically add the AP interfaces to their respective bridges.As Linux does not permit adding station type interfaces to bridges (the default interface type created during WiFi driver initialization), we will rely on
hostapd's ability to both reconfigure the interface type and add it to the bridge after.# AP1 Bridge (WiFi interface added by 'hostapd') ip link set veth-ap1 master br1 # AP2 Bridge (WiFi interface added by 'hostapd') ip link set veth-ap2 master br2 -
Configure your network daemon to ignore the interfaces
These instructions assume your system runs NetworkManager, which is generally the default unless you're doing something special (in which case I'll assume you can figure this out).
After running these commands, the interfaces should show as
unmanagedin the output ofnmcli device status. NetworkManager ignores veth interfaces by default.# Client nmcli device set wlan0 managed false # AP1 nmcli device set wlan1 managed false nmcli device set br1 managed false # AP2 nmcli device set wlan2 managed false nmcli device set br2 managed false -
Download example
hostapdandwpa_supplicantconfigs from hereWe'll use the configs in
wpa2/fast-transition/.git clone https://codeberg.org/a-gavin/hostap-confs.git -
Start the AP interfaces
In one terminal, start the first AP:
hostapd -t -i wlan1 hostapd_5GHz-wpa2-11r-ap1.confThen in another terminal, start the second AP:
hostapd -t -i wlan2 hostapd_5GHz-wpa2-11r-ap2.confAssuming no errors, you can verify operation with the
iw wlan1 infocommand, substituting for the desired interface name.This dual-AP configuration supports 802.11r. However, we'll switch between a client that does support and one that doesn't support 802.11r to illustrate the difference.
-
Run Wireshark using the
mac80211_hwsimpacket capture interfacePacket capture requires root permissions. See the Wireshark documentation here for more information.
-
Start the client interface
In a third terminal, run the following command. Initially, we'll test a client that doesn't support 802.11r configuration. Then, later we'll switch to using a client that does support 802.11r configuration.
# Use non-FT client config to start wpa_supplicant -t -i wlan0 -c supplicant_wpa2.conf -
Wait for client to connect
Once the client connects, you should also see the message
CTRL-EVENT-CONNECTEDin the client logs andAP-STA-CONNECTEDin one of the AP'shostapdlogs.Take note of the AP BSSID that the client connected to. You can run the
iw wlan2 linkcommand to verify connection, channel, SSID, BSSID, etc. -
Connect to the
wpa_supplicantCLI interfaceIn another terminal, run the following command. This should connect and show a
>prompt.wpa_cli
With the simulated client connected, Wireshark running, and the wpa_supplicant CLI up, it's time for some roaming!
Simulated Non-Fast Transition Client Roam
Test Overview and Goals
In this test, we'll simulate roaming with a client that doesn't support IEEE 802.11r BSS Fast Transition (FT).
A successful test should result in the client disconnecting from the initial BSS and then reconnecting to the other, target BSS. In doing so, the client and target BSS will go through the full connection process.
As we'll directly trigger the roam from the client side for both this and the next test, these are considered "hard" roam tests. In contrast, a "soft" roam test waits for the client to roam when it decides to. Each client implements its own, generally proprietary algorithm, which will trigger a roam as network conditions change (e.g. moving client away from one AP and closer to another).
Test Instructions
Using the wpa_supplicant CLI interface we configured earlier, we'll use the scan and roam commands to roam the simulated
client using basic, full reconnection roaming.
-
Trigger a scan in the
wpa_cliterminal with thescancommandIn order to roam the client successfully, it must have recently scanned the target AP BSS. The roam will fail if scan results are not recent. You can check this with the
scan_resultscommand.Real clients will run background scans, occuring based on internal logic and network conditions. The configurations used here do not run background scans. However, you can configure enable them with the
bgscanoption in the station config file.After triggering the client scan, you should see something like the following. The scan is complete when the
CTRL-EVENT-SCAN-RESULTSis shown. Asmac80211_hwsimradios support all bands, scanning may take awhile.> scan OK <3>CTRL-EVENT-SCAN-STARTED <3>CTRL-EVENT-SCAN-RESULTS -
Trigger the basic client roam with the
roamcommandThe format of the roam command is
roam <addr>, where<addr>is the BSSID of the target AP BSS to roam to.After triggering the client roam, you should see something like the following. If the client has not recently scanned the target AP BSS, the roam will fail.
> roam 02:00:00:00:02:00
OK
<3>SME: Trying to authenticate with 02:00:00:00:02:00 (SSID='testssid' freq=5200 MHz)
<3>Trying to associate with 02:00:00:00:02:00 (SSID='testssid' freq=5200 MHz)
<3>Associated with 02:00:00:00:02:00
<3>CTRL-EVENT-SUBNET-STATUS-UPDATE status=0
<3>WPA: Key negotiation completed with 02:00:00:00:02:00 [PTK=CCMP GTK=CCMP]
<3>CTRL-EVENT-CONNECTED - Connection to 02:00:00:00:02:00 completed [id=0 id_str=]
You can verify the roam with the
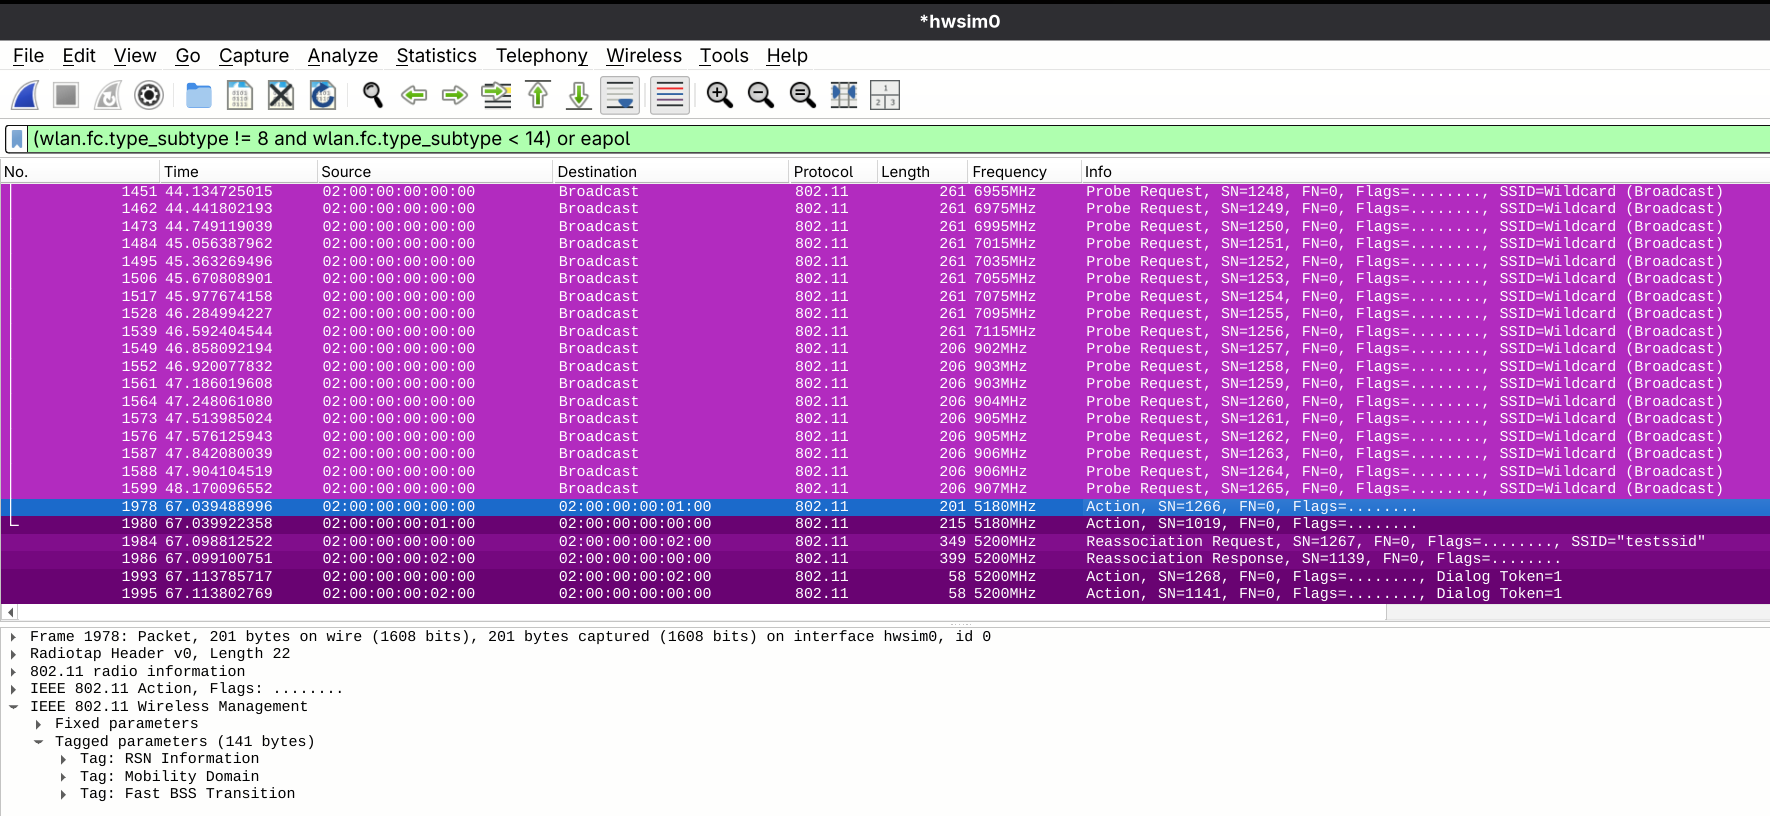
statuscommand inwpa_clior with theiw wlan0 linkcommand. I find theiwcommand slightly easier to read.Here's what a successful roam should look like in Wireshark using the
mac80211_hwsimpacket capture interface.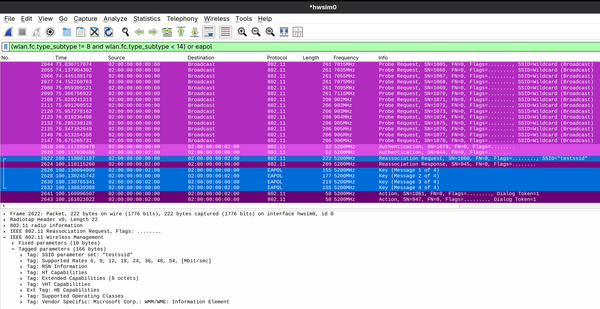
Simulated non-802.11r client scan and roam. Reassociation Request frame shown. Digging into this, the client first scans using Probe Request frames, triggered by our scan from
wpa_cli. Then, after the scan completes, we initiate the roam to the target AP BSS. The client selects the target BSS from its cached scan results and initiates the connection.Since the target AP BSS is part of the same extended service set (ESS), the client and AP use Reassociation Request and Reassociation Response frames during the connection process. After the association completes, the 4-way handshake occurs again, just as it did during initial association. In the screenshot, the Reassociation Request frame contents are shown at the bottom of the window. Note the information elements (IEs) included.
In this scenario, while the client roams within the same ESS, there is no coordination between the two APs. They exist independent of each other and do not coordinate, even though they share the same SSID and security configuration. Even if the client wanted to, there's no way for the initial AP to notify the target AP of the client's existence before it roams. This is not the case with 802.11r.
Simulated Fast Transition Client Roam
Test Overview and Goals
In the previous test, we demonstrated roaming a client that doesn't support IEEE 802.11r BSS Fast Transition (FT). In this test, we'll trigger a roam with a client that does support 802.11r, specifically an FT over the distribution system (FT-DS) roam.
As before, a successful test should result in the client disconnecting from the initial AP BSS and then reconnecting to the target AP BSS. Unlike the previous non-802.11r client test, though, the connection process here will look a bit different.
In 802.11r roaming, specifically FT-DS, an additional frame exchange should occur between the client and initial AP BSS before the client roams to the target AP BSS (FT-OTA works a bit differently). In addition, the frames transmitted to the target AP during the connection process will contain additional information that was not present in the non-802.11r roam test (true for both FT-DS and FT-OTA).
Test Instructions
After connecting the client using the 802.11r-capable wpa_supplicant configuration, we'll use the wpa_supplicant CLI interface
scan and ft_ds commands to roam the simulated client using 802.11r FT-DS roaming.
-
Reconnect the client with 802.11r-capable configuration
Stop the running
wpa_supplicantcommand and disconnect the client withCTRL+C. Then, reconnect with the following command.wpa_supplicant -t -i wlan0 -c supplicant_wpa2-11r.conf -
Trigger a scan in the
wpa_cliterminal with thescancommandAs in the previous test, look for the
CTRL-EVENT-SCAN-RESULTSto indicate scan completion. -
Trigger the FT-DS client roam with the
ft_dscommandThe format of the roam command is
ft_ds <addr>, where<addr>is the BSSID of the target AP to roam to. Both the client and target AP must support 802.11r for this to succeed. The client must have recently scanned the target AP as well.After triggering the client roam, you should see something like the following. If the client has not recently scanned the target AP or if either the client or APs don't support 802.11r, the roam will fail.
> ft_ds 02:00:00:00:02:00
OK
<3>Trying to associate with 02:00:00:00:02:00 (SSID='testssid' freq=5200 MHz)
<3>Associated with 02:00:00:00:02:00
<3>WPA: Key negotiation completed with 02:00:00:00:02:00 [PTK=CCMP GTK=CCMP]
<3>CTRL-EVENT-CONNECTED - Connection to 02:00:00:00:02:00 completed [id=0 id_str=]
<3>CTRL-EVENT-SUBNET-STATUS-UPDATE status=0
Here's what a successful FT-DS roam should look like in Wireshark using the
mac80211_hwsimpacket capture interface.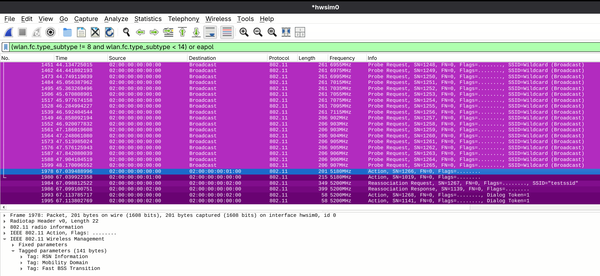
Simulated 802.11r client scan and roam. FT Action frame shown. As before, the client scans and roams based on cached scan results. However, unlike before, the Authentication frames and 4-way handshake are missing. There are also two new Action frames present before the Reassociation Request and Reassociation Response. This is expected!
As the network has already authorized the client on initial connection, 802.11r can leverage this assumption to its advantage. Using the Action frames just before the reassociation, the client notifies the initial AP of its intent to roam to another AP BSS within the same ESS (more specifically the same Mobility Domain). Assuming the initial AP responds successfully, the client can then send connect to the target AP BSS without the Authentication frame exchange or the 4-way handshake.
TODO On the backend (i.e. on the AP side), the AP/
Overall, in this 802.11r FT-DS test scenario with personal security configuration, the change to 802.11r eliminated six frames while introducing two. To be more specific, the Authentication and 4-way handshake frames are eliminated and FT Action frames are introduced (in FT-OTA, there are not FT-Action frames and Authentication frames are still present). When using an enterprise security configuration (802.1X), the EAP handshake is also eliminated, reducing the number of frames even further. In either scenario, 802.11r reduces roam latency, ensuring good user experience.
Closing Thoughts
In this post, we detailed how to run a simple client roam test as well as a 802.11r BSS Fast Transition (FT) roam test (FT-DS here)
using the Linux mac80211_hwsim WiFi simulation driver and standard WiFi tooling. These tests showcased the differences between
each test and highlighted how 802.11r client roams can sharply reduce roam time and improve end user experience.
I hope this shed some light on some of the intricacies involved in this testing. There's much much more to cover than the simple setup I showed here, but that's what makes real world testing all the more interesting!