WiFi Packet Capture on Linux
Overview
This guide demonstrates how to configure and use a WiFi radio on a Linux system to perform WiFi packet capture.
It assumes you have some experience with Linux, are familiar with general networking concepts, and have maybe at a little bit of WiFi knowledge. Root permissions on the system used for packet capture are also assumed.
Unlike other network interfaces like Ethernet, performing packet capture on a default wireless interface (e.g. wlan0) without adjustments will generally only capture network traffic above the link-layer (i.e. not WiFi). To capture arbitrary WiFi traffic and not just data exchanged between a client and an AP, one must conifgure a monitor interface. This guide details how to do so and more.
For some background information on WiFi, you may find my ramblings on the subject at LFNW 2023 useful.
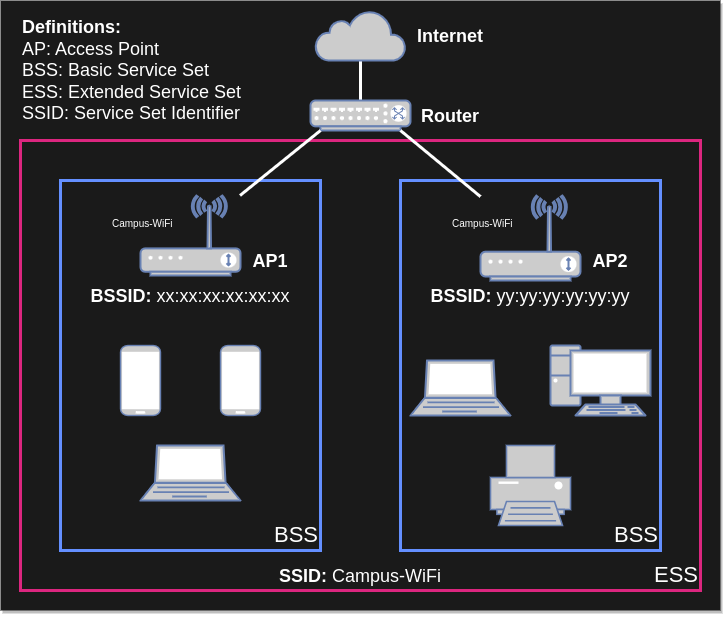
Definitions
Networking and WiFi use many acronymns and abbreviations, and I will use them in this guide. Here's a list of some common terms and their definitions (non-exhaustive).
- Radio: The physical hardware used to communicate over WiFi.
- Interface (or network interface): A logical software abstraction created by an operating system to manage a network device.
- STA (or station): Any client device that connects to an access point (AP).
- AP (or access point): What most people refer to as a 'router'. This device runs a centralized WiFi network (as opposed to P2P).
- vSTA (or virtual station): A network interface type. Same as STA, but primarily used when discussing STA network interfaces on a system.
- vAP (or virtual access point): A network interface type. Same as AP, but primarily used when discussing AP network interfaces on a system.
- Monitor: A network interface type used to perform packet capture.
- Band: A large slice of radio frequency (RF) spectrum available for use by WiFi. This includes 2.4GHz and 5GHz bands, as well as 6GHz band in many parts of the world.
- Channel: A pre-defined and regulated slice of a band which a STA and AP can use to transmit and receive data.
Instructions
1. Assumptions and Recommendations
Ensure that your radio works for your use case
This can be somewhat challenging. The easiest method is to check the supported channels output later in the guide. However, some radios have specific limitations that can be tricky to discover unless you know what to look for. When in doubt, read the kernel source (/s).
For example:
-
AX210 radios support 6 GHz, but AX200 radios do not
-
Both radios are 802.11ax, but only the AX210 is WiFi 6E (AX200 is WiFi 6).
-
Similarly, MTK7921k radios support 6 GHz, but MTK7921 radios don't.
-
-
MTK7922 radios can do 160MHz channels, but MTK7921 radios can only do 80MHz
-
AX210 and BE200 radios must perform firmware regulatory domain detection to permit 6 GHz band usage. More info here
For more information on the quirks of different devices, check out the Linux USB WiFi GitHub repository here. This project is a community-driven knowledge base with information on a variety of WiFi radios, including recommendations.
Ensure you have a backup internet connection method
You can perform packet capture offline. However, creating a monitor mode interface as this guide instructs will effectively disable WiFi for any other usage. I recommend connecting a backup network interface if at all possible (e.g. Ethernet).
Ensure that you have admin access on machine
The commands used here require sudo access.
2. Install Required Packages
NOTE: The iwconfig command, like the ipconfig command, is deprecated for usage on Linux. Use the iw command instead (or ip to replace ipconfig).
We'll use iw to configure and query the WiFi monitor interface and Wireshark to perform and analyze packet captures.
These are generally not installed by default on most Linux distros, though, so install them as follows.
# Debian/Ubuntu:
sudo apt install -y iw wireshark

# Fedora/RHEL:
sudo yum install -y iw wireshark
3. Determine Radio’s PHY Name
3.1 Determine PCI bus of radio
# Here there is one radio with PCI bus '03:00.0'
#
# May need to remove the pipe to grep and manually read output.
# Not all radios will appear w/ "Network controller" prefix.
$ lspci | grep Network
03:00.0 Network controller: MEDIATEK Corp. MT7921 802.11ax PCI Express Wireless Network Adapter
3.2 Determine name of radio
NOTE: You can use the list_interfaces.py script to both determine the radio name, radio index, and all interfaces created using that radio. With this information in hand, you can then skip to the Manage existing interfaces using radio section.
Find the phyX which matches the PCI bus found in the previous step:
# Here the PHY is 'phy0'.
#
# May need to remove the grep here if no output appears.
# It's possible the uppermost portion of the PCI bus is non-zero.
$ ls -d /sys/class/ieee80211/*/device/driver/* | grep 0000 | sed -E 's|^.*(phy[^/]+)/.*/|\1 |'
phy0 0000:03:00.0
4. Manage Radio's Other Interfaces
For context, some radios support virtual interfaces on Linux (i.e. you can create multiple simultaneous WiFi client or virtual AP interfaces). There are some limitations with this, though, namely all interfaces on one radio must operate on the same channel and more advanced WiFi features like OFDMA may not be supported.
Some radios, like many Intel radios (e.g. BE200), do not support virtual interfaces at all on Linux. They only permit a single STA or AP (non-virtual) per radio (limited to 2.4GHz only for APs on AX200, AX210, BE200 radios). These radios (and most others) do support simultaneous monitor and STA coexistence, but this has limitations and is generally not suggested.
With that said, ensuring that other network interfaces do not interfere with the packet capture depends on the radio you’re using. My personal suggestion is to remove all network interfaces from the radio before creating the monitor, unless required not to (i.e. 6GHz Packet Capture on Intel Radios). This simplifies things if you need debug your configuration later on.
4.1 Find all interfaces using radio
# Use sysfs directory structure to get interfaces
# Example path: `/sys/class/ieee80211/phy0/device/net/wlan0`
#
# Taken from this StackExchange answer: https://unix.stackexchange.com/a/552995
$ ls /sys/class/ieee80211/*/device/net/* -d | sed -E 's|^.*(phy[^/]+)/.*/|\1 |'
phy0 wlan0
4.2 Manage existing interfaces using radio
To simplify things, we'll remove any existing interfaces using the radio we want to use. We'll recreate this interface later on in this section.
If we left another interface hanging around, your networking daemon would almost certainly interfere, and we'd have to remember adjust system configuration both before and after packet capture. That's tedious.
# Deletes the 'wlan0' interface from the radio
$ sudo iw wlan0 del
5. Create Monitor Interface on Radio
# Creates monitor interface 'moni0' (initially in 'DOWN' state)
sudo iw phy0 interface add moni0 type monitor
6. Set Monitor Interface 'UP'
# Initially created in 'DOWN' state (as shown in output below)
# '-br' stands for brief and shortens output
$ ip -br link show dev moni0
moni0            DOWN           34:c9:3d:0e:79:64 <BROADCAST,MULTICAST>

# Set monitor interface 'UP' (no output, 0 return is success)
$ sudo ip link set up dev moni0

# Verify interface is 'UP'. Look for 'UP' and 'LOWER_UP' on right side.
# 'UNKNOWN' state is expected.
#
# 'UP' indicates interface is running. 'LOWER_UP' indicates underlying phy is up.
# For example, a non-configured but plugged in Ethernet device may be 'DOWN' but 'LOWER_UP'.
# See netdevice(7).
$ ip -br link show dev moni0
moni0            UNKNOWN        34:c9:3d:0e:79:64 <BROADCAST,MULTICAST,UP,LOWER_UP>
7. Configure Monitor Interface
Pay close attention here as this is where it can get tricky if you’re not paying attention. Complexity like bands and channel widths supported by your radio, regulatory domain, and even buggy behavior or radio firmware limitations can complicate this process.
7.1 Verify that the channel you want to sniff is supported
The following command lists channels supported by the radio.
# Output below is snipped for sake of example. The radio used
# in this example does not support 6 GHz band.
#
# Typically, the bands are as follows (although depends on your radio):
#    1: 2.4 GHz, 2: 5 GHz, 3: 6 GHz (if your radio supports 6 GHz)
$ iw phy0 channels
Band 1:
        * 2412 MHz [1]
          Maximum TX power: 22.0 dBm
          Channel widths: 20MHz HT40+
          ...
Band 2:
        * 5180 MHz [36]
          Maximum TX power: 22.0 dBm
          Channel widths: 20MHz HT40+ VHT80 VHT160
          ...
        * 5260 MHz [52]
          Maximum TX power: 22.0 dBm
          No IR
          Radar detection
          Channel widths: 20MHz HT40+ VHT80 VHT160
          DFS state: usable (for 60400 sec)
          DFS CAC time: 60000 ms
          ...
        * 5340 MHz [68] (disabled)
        * 5360 MHz [72] (disabled)
        * 5380 MHz [76] (disabled)
        * 5400 MHz [80] (disabled)
        * 5420 MHz [84] (disabled)
        * 5440 MHz [88] (disabled)
        * 5460 MHz [92] (disabled)
        * 5480 MHz [96] (disabled)
          ...
7.2 Configure monitor to desired channel
NOTE: This assumes your radio supports the channel you would like to do WiFi packet capture. See The previous step for more info. If you do not configure the channel, the monitor will default to the 2.4 GHz channel 1 with 20 MHz channel width.
The following methods demonstrate how to configure the monitor frequency (channel), each using a different command syntax:
There are two methods to configure the monitor channel, either by control frequency and channel width or by center frequency, channel width, and center frequency. Configuring with just control frequency and channel width is generally easier and less confusing.
# This syntax translates directly from 'iw phy0 channels' output.
# Newer versions of 'iw' permit configuring 160 MHz and 320 MHz channel widths.
sudo iw moni0 set freq 5180 80MHz
If you encounter errors, even after verifying that your radio supports the desired channel, check kernel kernel logs (sudo dmesg).
I find it useful to watch logs as I configure the monitor using two terminals, one for the configuration command, the other running
kernel logs (sudo dmesg -w).
The following is example error output for a radio which does not support 160 MHz channels:
$ sudo iw moni0 set freq 5180 160MHz
kernel reports: (extension) channel is disabled
command failed: Invalid argument (-22)
7.3 Verify monitor is on desired channel
# Assuming command to set channel succeeded ('iw moni0 set freq ...'),
# you should see desired channel and channel width output here
$ iw moni0 info
Interface moni0
        ifindex 17
        wdev 0x2
        addr 00:0a:52:06:3c:b4
        type monitor
        wiphy 0
        channel 140 (5700 MHz), width: 80 MHz, center1: 5690 MHz
        txpower 24.00 dBm
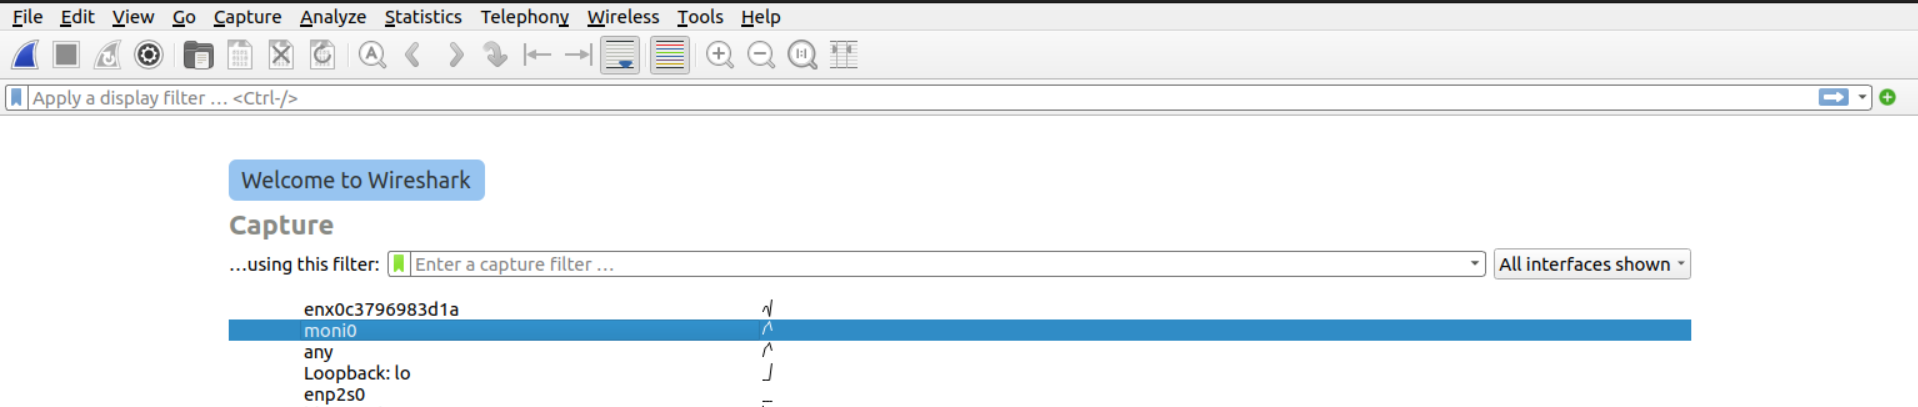
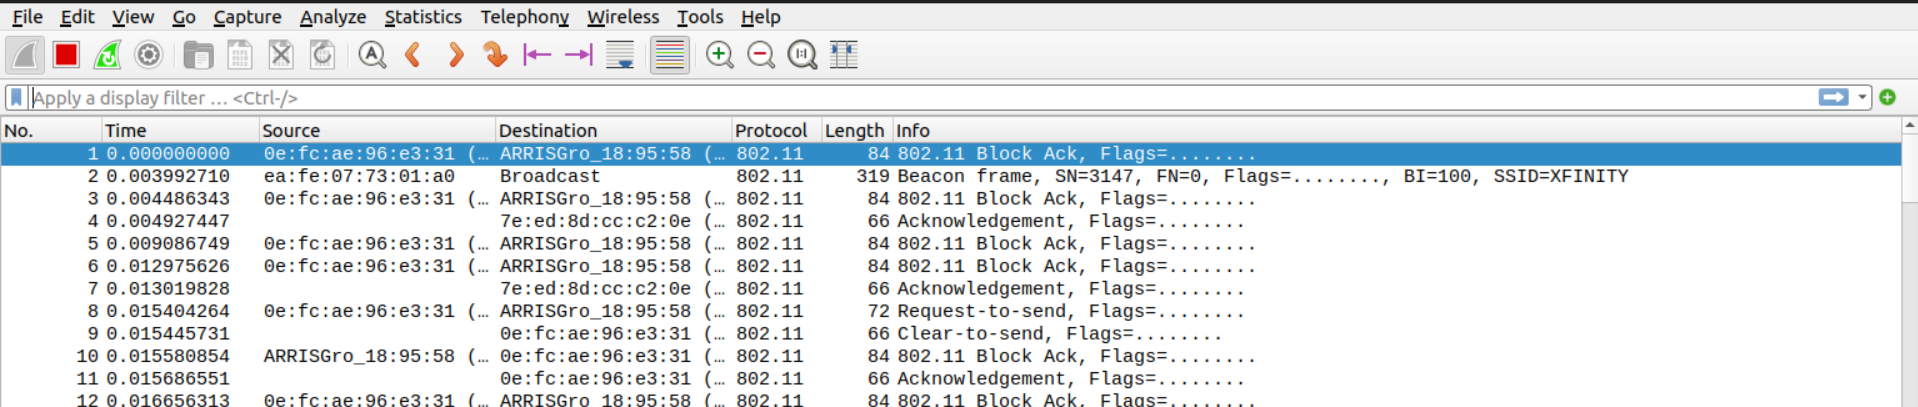
8. Run and analyze packet capture
Open Wireshark and select the monitor interface, then press ‘Enter’ to begin packet capture. If you know the interface
you want to sniff on, then you can run with the -i option and -k options to immediately start the capture on the
selected interface, e.g. wireshark -k -i moni0. Alternatively, you can use a CLI tool like tshark or dumpcap
to perform the capture and analyze it after.
For a more quick-reference WiFi (802.11) Wireshark filter cheatsheet, see this PDF.
Words of Wisdom
Always save your capture once you're done. For on-the-fly analysis, editing a live or recently-stopped capture in Wireshark is sufficient. However, it is very annoying to lose your data because Wireshark crashed while you updated the display filter.
Also, don't forget to stop your packet capture once you're done. It will eat up your disk space if you let it!
9. Decrypting WPA-Personal & WPA2-Personal WiFi Traffic
When attempting to capture network traffic to/from an access point (AP) that uses "open" authentication (i.e. no encryption), no extra configuration is necessary. Everything is plaintext and painfully insecure. Wireshark just decodes the data as you'd expect. However, for networks which use encryption, some extra work is required.
For WPA-Personal and WPA2-Personal, configuration is pretty straightforward. However, WPA3-Personal is more complicated given increased security (which is good!). See the Wireshark guide for more information.
To decrypt WPA-Personal and/or WPA2-Personal WiFi traffic, perform the following steps:
-
Configure the SSID and password in Wireshark
-
Capture the client connection to the AP (commonly referred to as the four-way handshake, filter for
eapol)
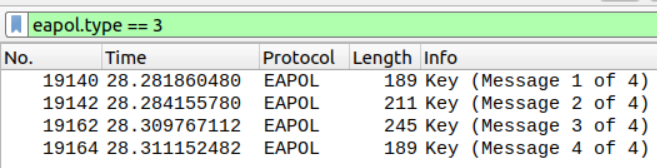
With WPA2-Personal, you may still see some management and control frames encrypted. This stems from the client and AP enabling 802.11 protected managment frames (PMF), which is possible to disable from either end depending on your device. However, this is outside the scope of this guide.
10. Reset Your WiFi
Okay you had your fun, now time to use your WiFi again. Either reboot or run the following commands.
# Delete monitor interface
$ sudo iw moni0 del

# Recreate virtual interface we previously deleted, 'managed' is type STA/client
$ sudo iw phy0 interface add wlan0 type managed
6GHz Packet Capture with Intel Radios
NOTE: I have only tested this with AX210 and BE200 radios operating in a US wireless regulatory domain.
NOTE: This assumes that you have determined the radio's phy name and know how to find all interfaces using the radio.
The AX210 and BE200 radios are WiFi 6E and WiFi 7 radios, respectively (unlike the AX200 which is WiFi 6). For context, WiFi 6E is the first generation of WiFi which supports the new 6GHz band. While both radios can only operate as an AP in the 2.4GHz band on Linux, both can operate as both a STA and monitor on 2.4GHz, 5GHz, and 6GHz bands. To use a monitor in the 6GHz band, though, you need to follow a couple steps first.
To configure a 6GHz Intel radio monitor, the radio firmware must first detect that it is in the US wireless regulatory domain. Then, after detection, you can create a monitor on the 6GHz channels that the radio supports. To do so, perform the following steps.
1. Delete All Other Interfaces Using Radio
Delete all network interfaces using the radio by following the instructions which run iw ... del in this section.
2. Create and Up a Station on Radio
# Create interface 'wlan0' on radio ('managed' is type STA)
$ sudo iw phy0 interface add wlan0 type managed

# Admin 'UP' the station, so you can use it
# '-br' stands for brief and shortens output
$ sudo ip -br link set dev wlan0 up

# OPTIONAL
# Show channels permitted for use on radio
$ iw phy0 channels
3. Run a Scan on Station
# Admin 'UP' the station, so you can use it
$ sudo iw wlan0 scan
4. Create Monitor Interface on Radio
# Creates monitor interface 'moni0' (initially in 'DOWN' state)
sudo iw phy0 interface add moni0 type monitor

# 'UP' monitor interface, so you can use it
$ sudo ip -br link set dev moni0 up
5. Down Station
NOTE: Do not delete the STA interface, only 'DOWN' it. You must keep it in order to scan 6GHz.
It is critical that this step comes after creating and 'UP'ing the monitor interface. Otherwise, you will be unable to configure the Intel radio monitor for 6GHz channels.
# Admin 'DOWN' the station. Does not delete it.
# '-br' stands for brief and shortens output
$ sudo ip -br link set dev wlan0 down
6. Verify 6GHz Channels Enabled
NOTE: You may see output which only list 20MHz supported channel widths. You should be able to configure other channel widths (40MHz, 80MHz, 160MHz). However, it may take some trial and error. Your best bet is to reference the 6GHz supported channels. Primary scanning channels (PSC) have worked well in my experience.
Look for any 6GHz channels in the output of this command (should be at the end). If you see them, then you can configure the monitor on 6GHz channels. If you jumped here from earlier in the guide, jump to the configure monitor interface step and proceed.
# Prints out enabled channels on radio
$ iw phy0 channels
References
NOTE: The behavior of iwconfig and ifconfig has been superceded by NetworkManager on most Linux systems. Some of the following references use it instead.